Bypass SSL Pinning with LLDB in iOS app
Written on April 9, 2020
Imagine that you want to inspect the app to see what’s information exchange between mobile app and server, you can think about using simple proxy tools to sniff requests and responses or more advanced techniques such as a reverse binary file to see what are endpoints, parameters and response payloads… To starting SSL Pinning bypass series, this post will introduce how to leverage LLDB tools to disable SSL pinning in iOS apps and reverse engineering process.
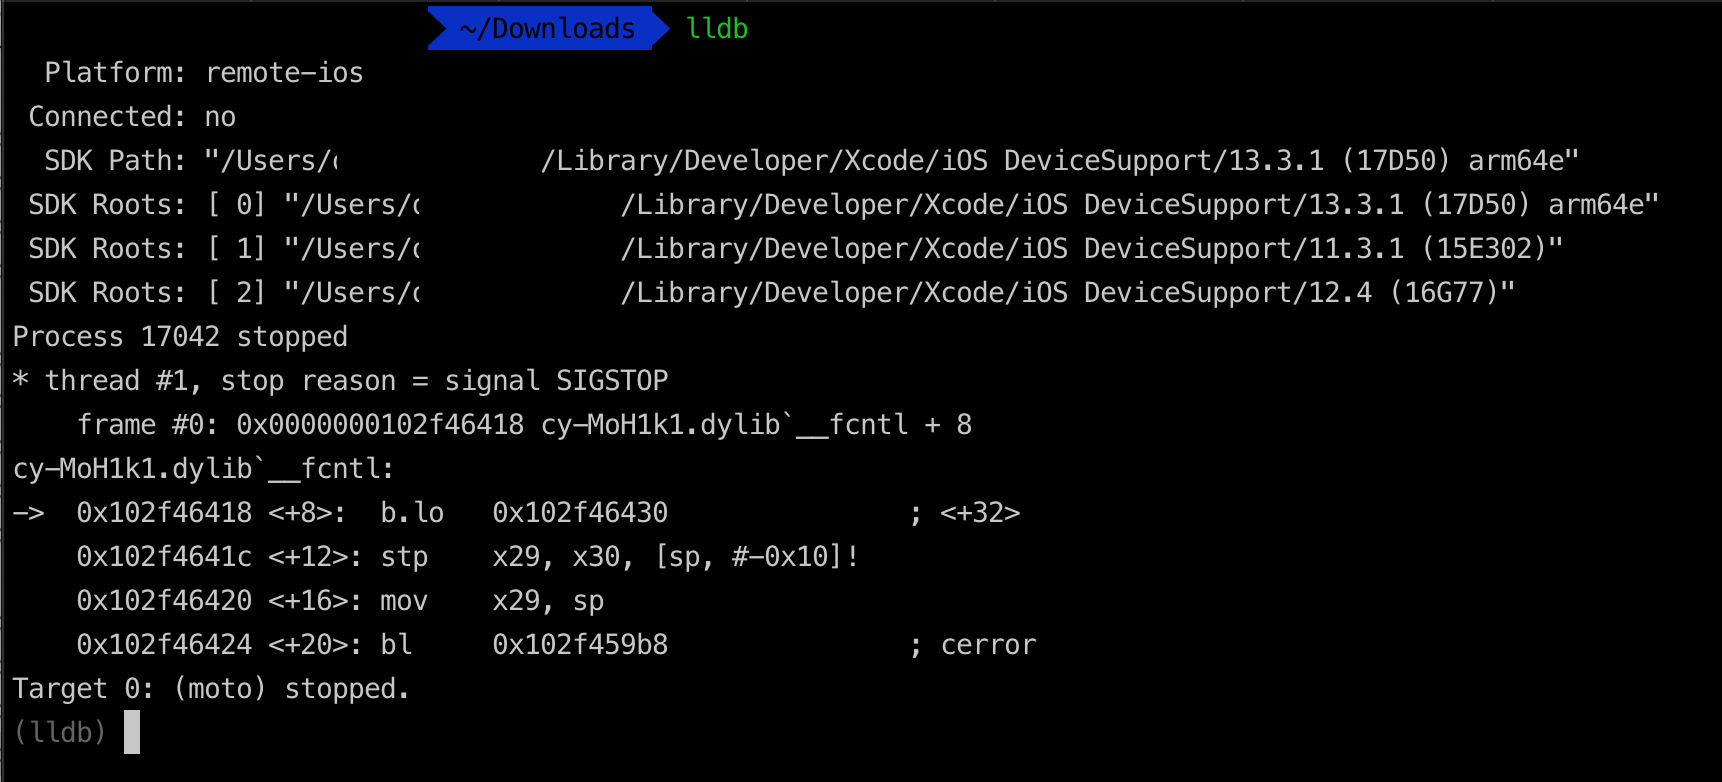
Figure: LLDB Attached
Disclaimer
This post is for educational purposes only. How you use this information is your responsibility. I will not be held accountable for any illegal activities, so please use it at your discretion and contact the app’s author if you find issues. We will inspect an app name REDACTED. The figures during the post just for demonstrations, might not relevant to REDACTED app.
Prerequisites
Below tools are used during this post:
- A jailbroken device.
- Installing Burp’s CA Certificate in an iOS Device
- Configuring an iOS Device to Work With Burp
- Hopper Disassembler
- Setup LLDB environment
Overview
We want to know how REDACTED app exchange info with server, so let pick up Burp Suite as proxy tool to sniff requests. Launch Burp Suite and do some necessary setup as Prerequisites section. Observe HTTP history tab in Burp Suite while launching the app, we don’t see any requests that exchange player info or configuration, something looks wrong here. Normally when we launch the app, we should see some kind of requests to get app configuration or send player state (game apps)… An idea comes in our minds that this may be due to SSL Pinning employed in the app.
If you don’t know what is SSL Pinning, I suggest referring this detailed explanation article about how SSL Pinning works. In short, SSL Pinning is a way for the client-side to verify whether the app communicates only with the designated server itself. When the app has SSL Pinning implemented, connect it via proxy server will not work because the client will think that proxy as a server, not a real one and it won’t establish a connection to that proxy server (due to certificate/public key of that proxy server not match with the one bundled in the app), so no requests will be made and no records will be shown in HTTP history tab. To make app requests appear on this tab, we need to find a way to downgrade https requests to http. And when the app communicates by HTTP protocol, there no need for SSL Pinning evaluation and our Burp Suite proxy will easily Catch ‘Em All. To double confirm this, let’s do some analysis. ^_^
Static Analysis
Inspect .ipa resources
With the help of Frida iOS Dump or CrackerXI, we can easily pull out .ipa file of REDACTED app on a jailbroken device, unzip .ipa and navigate to Payload/REDACTED.app folder. All of the app resources and binary files are inside this folder.
We know that there are 2 ways of doing SSL Pinning: Pin the certificate or pin the public key. Pin the certificate is the easier way of implementing SSL Pinning as the developer just needs to download the server’s certificate and bundle them in the app and at run time, the app will compare server-side certificate with the one bundled.
Normally the certificate files in iOS app will have .cer or .der extensions. This is DER encoding, you can refer this article for more details.
Open Terminal and navigate to inside of REDACTED.app then run this command to search for certificate files: find . -name "*.cer"
MBP# find . -name "*.cer"
./redacted_test_ca.cer
./redacted.cer
./certificate.cer
./redacted_certificate.cer
./server_ranking.cer
./mqttServer.cer
Figure 1: Find certificate files
As we can see, the certificate files are bundled in the app, so we can say mostly this app has SSL Pinning implemented - pin the certificate. In case you inspect the app and don’t find any certificate files with this command, it might be the developer pinned the public key instead, you need to inspect the binary file. I will share it in another post.
That’s fine now. Let’s hunt look for the URLs that the app is using because this is the parameter that network frameworks will use to make requests like NSURLSession, AlamoFire, AFNetworking… just to name as a few.
Hunt for base URL (https)
We are sure that the REDACTED app is using secure https endpoints to communicate with the server because if just HTTP then it will be shown in HTTP history tab. There are some places most developers prefer to put the base URLs of the app for reuse over the entire app:
- Info.plist in host app (REDACTED.app/Info.plist)
- Mach-O binary file in the host app (REDACTED.app/REDACTED)
- Info.plist or Mach-O file in the framework (the app has dedicated network frameworks, for ex. REDACTED.app/Frameworks/NetworkXYZ.framework/Info.plist, REDACTED.app/Frameworks/NetworkXYZ.framework/NetworkXYZ …)
By starting search https string in that order using strings command - strings looks for ASCII strings in a binary file or standard input. strings is useful for identifying random object files and many other things, we can find some outcomes in the REDACTED Mach-O file.
MBP# strings -a REDACTED | grep https
https://redacted-backend.redacted.com/
https://www.redacted.com/games/redacted/privacy
https://graph.facebook.com/
https://private-redacted-api.redacted.com/
Figure 2: Find base HTTPS endpoints
It looks like https://redacted-backend.redacted.com and https://private-redacted-api.redacted.com are the ones suspicious. These might be the base URLs that the app will use and append with other URLs’ path to make the requests. It’s time to trace where these URLs string are used in the app. We might need the help of Hopper Disassembler.
Trace references of base URLs - Hopper Disassembler
Now let level up our skillset of static analysis with Hopper Disassembler tool - the reverse engineering tool that lets you disassemble, decompile our app. In this case, we use Hopper to disassemble Mach-O file to assembly instructions (arm64 for this case) and find down the reference of https string.
Launch Hopper Disassembler app then drag and drop our REDACTED.app/REDACTED into Hopper and wait for a while for it to disassemble. When it finishes, switch to Str tab on the left panel and search for https:// string, it will show exactly results as the one we used strings command.
Let click on the https://redacted-backend.redacted.com/ on the left panel, it will navigate to this address on the right:
0000000101522d9d db "https://redacted-backend.redacted.com/", 0 ; DATA XREF=cfstring_https___redacted_backend_redacted_com_
Figure 3: Find base HTTPS endpoints in Hopper Disassembler
Double click on DATA XREF=cfstring_https___redacted_backend_redacted_com_ to find when it is referenced, it would navigate to new location with showing methods referenced to this string.
	cfstring_https___redacted_backend_redacted_com_:
00000001019c5170  dq  0x00000000000007c8 ; "https://redacted-backend.redacted.com/", DATA XREF=-[BackendController init]+112
Figure 4: HTTPS string references in Hopper Disassembler
We can see that there is a method using this string: -[BackendController init]. If you ever developed Objective-C applications before you should be familiar with this syntax. For those who did not, let me make it short. This is objective-C class initialzers (a.k.a constructors). So in Swift language it would be same like this BackendController.init(). Let double click on this -[BackendController init] to navigate to where exactly it is used.
	-[BackendController init]:
...
100037fdc  adrp       x8, #0x101f09000
100037fe0  ldr        x0, [x8, #0x3c8]            ; objc_cls_ref_BackendHttpClient,__objc_class_BackendHttpClient_class
100037fe4  adrp       x8, #0x101eb7000
100037fe8  ldr        x20, [x8, #0xb88]           ; "alloc",@selector(alloc)
100037fec  mov        x1, x20
100037ff0  bl         imp___stubs__objc_msgSend   ; objc_msgSend
100037ff4  adrp       x8, #0x101eba000
100037ff8  ldr        x1, [x8, #0x50]             ; "initWithBaseURL:",@selector(initWithBaseURL:)
100037ffc  adrp       x2, #0x1019c5000
100038000  add        x2, x2, #0x170              ; @"https://redacted-backend.redacted.com/"
100038004  bl         imp___stubs__objc_msgSend   ; objc_msgSend
100038008  mov        x21, x0
10003800c  adrp       x8, #0x101eba000
100038010  ldr        x1, [x8, #0x58]             ; "setHttpClient:",@selector(setHttpClient:)
100038014  mov        x0, x19
100038018  mov        x2, x21
10003801c  bl         imp___stubs__objc_msgSend   ; objc_msgSend
100038020  mov        x0, x21
...
Figure 5: -[BackendController init]
Please don’t panic with these assembly instructions and give up, I promise I will explain right now what are they. Just look into it again you will see that the string is being referenced at address 100038000 with assembly instruction add x2, x2, #0x170 and nicely generated comment ; @"https://redacted-backend.redacted.com/". Please note down this address 100038000, we will use this when debugging the app in the next sections.
What is ARM64 instructions?
I won’t explain everything about ARM64 instructions here but I will try to explain some basic instructions for the sake of this post so that you can continue to follow through (to be honest even now I still need to learn a lot about this powerful language, I recently got addicted to this and found it like a puzzle game to play).
First, what is assembly language? Let me quote this short explanation from Wiki: In computer programming, assembly language (or assembler language), often abbreviated asm, is any low-level programming language in which there is a very strong correspondence between the instructions in the language and the architecture’s machine code instructions. Because assembly depends on the machine code instructions, every assembler has its own assembly language which is designed for exactly one specific computer architecture. Let me break down there terms:
- Machine code instructions: Objective-C or Swift are high-level languages. Your Objective-C or Swift code is compiled into assembly language, which is low-level. This assembly is then assembled by an assembler into machine code so that the CPU can read (0s and 1s). You can open REDACTED file in any text editor, you will see machine code instructions:
cffa edfe 0c00 0001 0000 0000 0200 0000
5c00 0000 2026 0000 8580 2100 0000 0000
1900 0000 4800 0000 5f5f 5041 4745 5a45
524f 0000 0000 0000 0000 0000 0000 0000
0000 0000 0100 0000 0000 0000 0000 0000
0000 0000 0000 0000 0000 0000 0000 0000
0000 0000 0000 0000 1900 0000 0804 0000
5f5f 5445 5854 0000 0000 0000 0000 0000
0000 0000 0100 0000 00c0 9201 0000 0000
0000 0000 0000 0000 00c0 9201 0000 0000
0500 0000 0500 0000 0c00 0000 0000 0000
5f5f 7465 7874 0000 0000 0000 0000 0000
5f5f 5445 5854 0000 0000 0000 0000 0000
b455 0000 0100 0000 c484 3101 0000 0000
b455 0000 0200 0000 0000 0000 0000 0000
0004 0080 0000 0000 0000 0000 0000 0000
5f5f 7374 7562 7300 0000 0000 0000 0000
5f5f 5445 5854 0000 0000 0000 0000 0000
78da 3101 0100 0000 983a 0000 0000 0000
78da 3101 0200 0000 0000 0000 0000 0000
0804 0080 0000 0000 0c00 0000 0000 0000
...
Figure 6: Machine code in Hexadecimal form
-
Computer architecture: It’s CPU Architecture, for ex.
arm64(is the current 64-bit ARM CPU architecture, as used since the iPhone 5S and later),armv7s(being used in Apple’s A6 and A6X chips on iPhone 5, iPhone 5C and iPad 4),armv7(32-bit ARM CPU, as used in the A5 and earlier),x86_64(64-bit Intel - Simulator),i386(32-bit Intel - Simulator) iOS devices use CPU based on ARM architecture. In my opinion, this is easy to read compare to x86_64 instructions set. -
Registers: There is series of levels of memory. Those are close to the CPU are fastest. In a modern computer, these are typically something like: CPU registers > L1 cache > L2 cache > L3 cache > Main memory > HDD. The processor will use some internal memory storage locations, a.k.a registers. For ARM64, there are 32 general purpose registers and some special registers, please have a look below for more details and when it can be used.
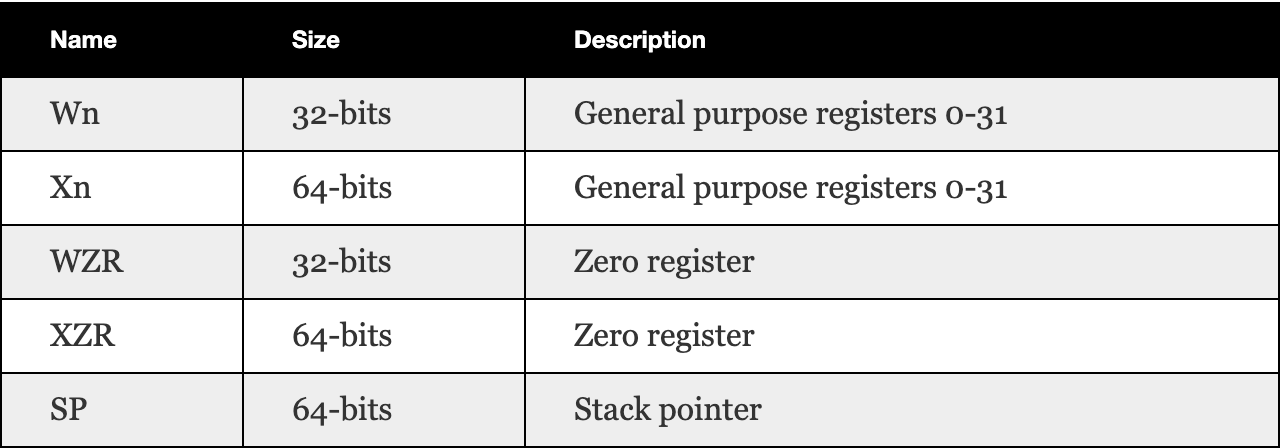
Figure 7: Registers
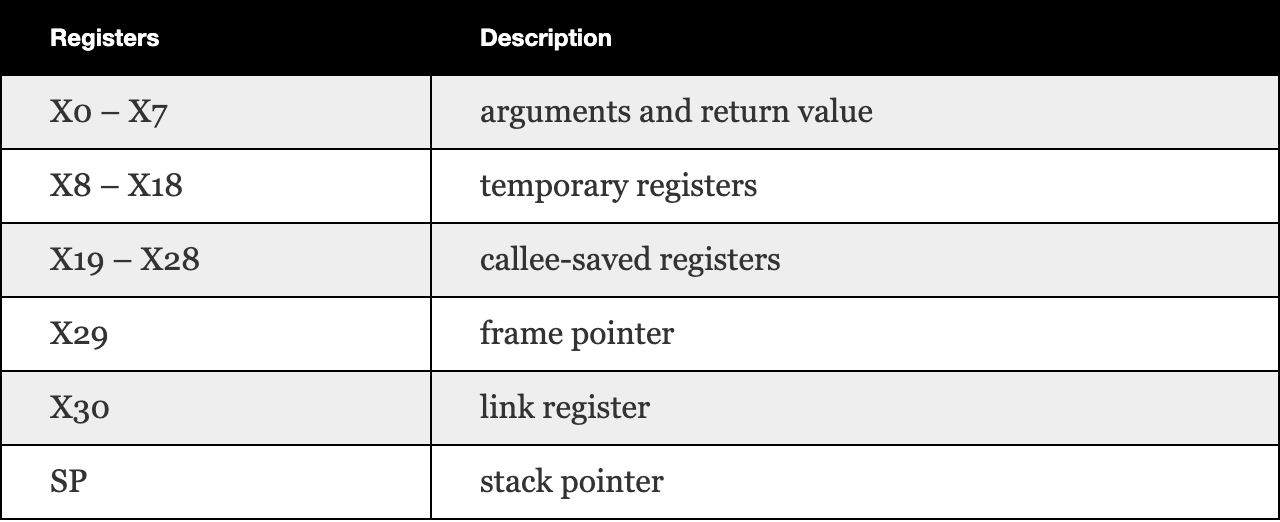
Figure 8: Registers purpose - Assembly instruction: There are many commands (operation code - opcode), it’s a single instruction that can be executed by the CPU. The general format can be considered as the instruction, followed by the operands:
Instruction Rd, Rn, Operand2where Instruction is a command (MOV, SUB, ADD…), Rd is destination register, Rn is the register that is operated on, Operand2 might be a register or immediate value (for ex. #0xff).
I think that would be enough, for now, I will explain more when we reach those instructions in the next section, debug app with LLDB.
Dynamic Analysis
LLDB is fully integrated with XCode since XCode 5, so if you are an iOS developer you’ve already get familiar with it as a daily job. We can attach to the running process from XCode or Terminal, for this post I will run LLDB from the terminal and attach to running app on the jailbroken device. Assume you already setup debugserver on jailbroken device in Prerequisites section.
Start debugserver
Let SSH to the jailbroken device, for my case, it would be like this: ssh ipse_home, for your case it would be ssh root@your_device_ip_address. You might need to key in when password prompts (default password is alpine). If you would like to debug on jailbroken device often, you can create an SSH shortcut in your ~/.ssh/config file like this (more details you can reference this post for how to setup) then you can SSH via shortcut instead. You also can SSH Passwordless login using SSH Keygen if you manage to SSH more often.
Host ipse_home
	HostName 192.168.1.113
	User root
Figure 9: SSH Shortcut
After SSH into the jailbroken device, we will use debugserver to attach to the app and listen for connections from other machines then from our laptop we will launch LLDB to connect to debugserver for remote debugging. Let’s do step by step.
From Terminal SSH into the device, then run this command: debugserver 0.0.0.0:1234 -w "Executable file"
- Executable file is the process name we want to attach (this value you need to get from
Info.plistfile). 0.0.0.0is the IP range allows for other connections to connect (if you know the IP address of remote debugging machine then please specify that for secure).1234is port number (you can define any if you want).-wargument is abbreviation of--waitforwhich will wait for process to launch (if not launched yet) or attach immediately if it’s been already launched.iPhone-SE:~ root# debugserver 0.0.0.0:1234 -w REDACTED debugserver-@(#)PROGRAM:LLDB PROJECT:lldb-900.3.57..2 for arm64. Waiting to attach to process REDACTED...Figure 10: Start debugserver
Let assume you already configured the jailbroken device using Burp Suite proxy, the app was not started yet then start above debugserver command. Whenever you see the output Waiting to attach to process, it’s time to launch our app from the jailbroken device and you can see from Terminal it will print out new message Listening to port 1234 for a connection from 0.0.0.0... which means that it attached successfully and waiting for a connection to debug.
iPhone-SE:~ root# debugserver 0.0.0.0:1234 -w REDACTED
debugserver-@(#)PROGRAM:LLDB  PROJECT:lldb-900.3.57..2
 for arm64.
Waiting to attach to process REDACTED...
Listening to port 1234 for a connection from 0.0.0.0...
Figure 11: debugserver attached process
Launch LLDB
We will use LLDB as a standalone debugger for this post instead of LLDB debugger through XCode debugging feature (XCode console pane). So let have some fun with LLDB command line, why not?
Now let the fun begin. Open another tab of Terminal and run lldb command.
MBP# lldb
(lldb)
Figure 12: Start LLDB standalone
From lldb prompt, type platform select remote-ios then process connect connect://192.168.1.113:1234 to attach into our app (process) via debugserver (just to remember 192.168.1.113 is the IP address of the jailbroken device). If we can attach to the process successfully, you will see this log in Terminal:
(lldb) platform select remote-ios
  Platform: remote-ios
 Connected: no
  SDK Path: "/Users/xyz/Library/Developer/Xcode/iOS DeviceSupport/13.3.1 (17D50) arm64e"
 SDK Roots: [ 0] "/Users/xyz/Library/Developer/Xcode/iOS DeviceSupport/13.3.1 (17D50) arm64e"
 SDK Roots: [ 1] "/Users/xyz/Library/Developer/Xcode/iOS DeviceSupport/11.3.1 (15E302)"
 SDK Roots: [ 2] "/Users/xyz/Library/Developer/Xcode/iOS DeviceSupport/11.0 (15A372)"
 SDK Roots: [ 3] "/Users/xyz/Library/Developer/Xcode/iOS DeviceSupport/12.4 (16G77)"
Process 19596 stopped
* thread #1, queue = 'com.apple.main-thread', stop reason = signal SIGSTOP
    frame #0: 0x000000018104e3b0 libsystem_c.dylib`strlen  + 48
libsystem_c.dylib`strlen:
->  0x18104e3b0 <+48>: ldr         	q0, [x1, #0x10]!
    0x18104e3b4 <+52>: uminv.16b 	b1, v0
    0x18104e3b8 <+56>: fmov 		w2, s1
    0x18104e3bc <+60>: cbnz 		w2, 0x18104e3b0 	; <+48>
Target 0: (REDACTED) stopped.
Figure 13: LLDB attached to process
In case lldb shows the SDK Path error or something, you might double-check if your device iOS version exists in XCode iOS DeviceSupport or not. You can refer this great post to troubleshoot if issues.
You need to type these 2 above commands everytime you want to debug application in lldb prompt, to save time, LLDB allow to config commands can be loaded when lldb start. You just need to copy those 2 commands and put in ~/.lldbinit will do. Here is my sample ~/.lldbinit file:
## .lldbinit start ###
command alias rr register read
command alias rw register write
command alias mr memory read
command alias mw memory write
command alias il image list -o -f
command alias eoc expression -l objc -O --

platform select remote-ios
process connect connect://192.168.1.113:1234
Figure 14: ~/.lldbinit
You can define lldb command alias here also, and it will take effect in lldb prompt. But there will be a problem here if you are an iOS developer because this file will also be applied for LLDB in XCode, which means when you debug an application in XCode it also load this init file and will cost you some more time to launch the application.
To separate the configuration between LLDB standalone and LLDB of XCode, you can create a new ~/.lldbinit-Xcode file and put your commands there just for XCode usage. Whenever you debug application via XCode, it will check if ~/.lldbinit-Xcode file if exists then XCode will load this file instead of ~/.lldbinit.
Set breakpoints
Now, lldb attached to the app process and waiting for us to debug, you might notice that the app is hanging on the jailbroken device because the process is being interrupted. The debug process would be the same as we debug in XCode except in XCode you debug through each line of code, here you debug each line of assembly instruction, and you examine registers instead of variables.
Before examining registers, let set a breakpoint first. Go back to Hopper Disassembler, go to address 0x100038000 of -[BackendController init] method, we need to set the breakpoint at this address to see if application will invoke this method or not and examine value of URL string passed to the registers (in Hopper Disassembler, press G then put in address value to navigate to). In LLDB, to set breakpoint at an address we can type: breakpoint set --address 0x100038000, or br s -a 0x100038000 for short then enter.
(lldb) breakpoint set --address 0x100038000
warning: failed to set breakpoint site at 0x100038000 for breakpoint 1.1: error: 0 sending the breakpoint request
Breakpoint 1: address: 0x100038000
Figure 15: LLDB set breakpoint failed
But look at that warning, it failed to set breakpoint at 0x100038000. Why??? The reason it’s failed because of ASLR (Address Space Layout Randomization). ASLR is a memory-protection process for operating systems (OSes) that guards against buffer-overflow attacks by randomizing the location where system executables are loaded into memory.. We need to calculate the real address when the process is running to set a breakpoint (we need to re-calculate real address every time we start the app). Real Address = ASLR shift + Hopper Address, let find out missing part ASLR Shift.
From lldb prompt, type image list -o processName then enter, the result in the console is the ASLR shift (please note that the value might not the same for you as it’s a random number).
(lldb) image list -o REDACTED
[ 0] 0x00000000045bc000
(lldb)
Figure 16: ASLR Shift
My case ASLR Shift = 0x00000000045bc000, so Real Address = ASLR shift + Hopper Address = 0x00000000045bc000+0x100038000 = 0x1045F4000. Let set breakpoint again: br s -a 0x00000000045bc000+0x100038000 or br s -a 0x1045F4000 then enter.
(lldb) br s -a 0x00000000045bc000+0x100038000
Breakpoint 2: where = REDACTED`___lldb_unnamed_symbol1321$$REDACTED + 112, address: 0x00000001045F4000
Figure 17: Set breakpoint successfully
We just set breakpoint successfully, now let the process continue to run by typing: continue or c then enter. It will run the app for a second then you will see it will stop again in console, IT HITS THE BREAKPOINT!!!!
(lldb) c
Process 19596 resuming
Process 19596 stopped
* thread #1, queue = 'com.apple.main-thread', stop reason = breakpoint 2.1
	frame #0: 0x00000001045f4000 REDACTED`___lldb_unnamed_symbol1321$$REDACTED + 112
REDACTED`___lldb_unnamed_symbol1321$$REDACTED
->  0x1045f4000 <+112>: add 	x2, x2, #0x170  ; =0x170
    0x1045f4004 <+116>: bl      0x1058dcae4     ; symbol stub for: objc_msgSend
    0x1045f4008 <+120>: mov 	x21, x0
    0x1045f400c <+124>: adrp 	x8, 7810
Target 0: (REDACTED) stopped.
(lldb)
Figure 18: LLDB hits breakpoint
Examine registers
You can see the process stopped at our breakpoint (at address 0x1045F4000) at the instruction add x2, x2, #0x170. Let have a look again in Hopper Disassembler for these instructions:
	-[BackendController init]:
...
100037fdc  adrp       x8, #0x101f09000
100037fe0  ldr        x0, [x8, #0x3c8]            ; objc_cls_ref_BackendHttpClient,__objc_class_BackendHttpClient_class
100037fe4  adrp       x8, #0x101eb7000
100037fe8  ldr        x20, [x8, #0xb88]           ; "alloc",@selector(alloc)
100037fec  mov        x1, x20
100037ff0  bl         imp___stubs__objc_msgSend   ; objc_msgSend
100037ff4  adrp       x8, #0x101eba000
100037ff8  ldr        x1, [x8, #0x50]             ; "initWithBaseURL:",@selector(initWithBaseURL:)
100037ffc  adrp       x2, #0x1019c5000
100038000  add        x2, x2, #0x170              ; @"https://redacted-backend.redacted.com/"
100038004  bl         imp___stubs__objc_msgSend   ; objc_msgSend
100038008  mov        x21, x0
10003800c  adrp       x8, #0x101eba000
100038010  ldr        x1, [x8, #0x58]             ; "setHttpClient:",@selector(setHttpClient:)
100038014  mov        x0, x19
100038018  mov        x2, x21
10003801c  bl         imp___stubs__objc_msgSend   ; objc_msgSend
100038020  mov        x0, x21
...
Figure 19: Instructions explanation
I put comment for those instructions, the add x2, x2, #0x170 can be translated as x2 = x2 + #0x170 = #0x1019c5000 + #0x170 = 0x1019c5170, this is the address of https://redacted-backend.redacted.com/ (you can look back above Figure 4) and Hopper Disassembler is smart enough to find out and put comment at the end of this instruction. So after executing this instruction, we expect value of x2 is https://redacted-backend.redacted.com/. Let type next or n then enter to execute this instruction.
Now to check value of register x2, you can type po $x2 (po is print object) or register read x2, you will see register x2 now holding address that contains string https://redacted-backend.redacted.com/
(lldb) next
Process 19596 stopped
* thread #1, queue = 'com.apple.main-thread', stop reason = breakpoint 2.1
	frame #0: 0x00000001045f4004 REDACTED`___lldb_unnamed_symbol1321$$REDACTED + 116
REDACTED`___lldb_unnamed_symbol1321$$REDACTED
->  0x1045f4004 <+116>: bl    0x1058dcae4    ; symbol stub for: objc_msgSend
    0x1045f4008 <+120>: mov   x21, x0
    0x1045f400c <+124>: adrp  x8, 7810
    0x1045f4010 <+128>: ldr   x1, [x8, #0x58]
Target 0: (REDACTED) stopped.
(lldb) po $x2
https://redacted-backend.redacted.com/

(lldb) register read x2
	x2 = 0x0000000105f81170    @"https://redacted-backend.redacted.com/"
Figure 20: Examine register x2
Change registers value
As we are in debug mode, to change value of register is trivial. We want to downgrade https to http protocol so we need to change value of register x2 from https://redacted-backend.redacted.com/ to http://redacted-backend.redacted.com/, let do it:
- First, let create new
http://redacted-backend.redacted.com/string by:expression @"http://redacted-backend.redacted.com/"ore @"http://redacted-backend.redacted.com/", it will spit out new string created with address of that string in memory. As below,0x00000001c0c63740is address of new string for my case:(lldb) expression @"http://redacted-backend.redacted.com/" (__NSCFString *) $5 = 0x00000001c0c63740 @"http://redacted-backend.redacted.com/" (lldb)Figure 21: Create a new string
- Next, we need to set register
x2to hold new value by:register write x2 0x00000001c0c63740and examine its value again, we can seex2now reflected new value:
(lldb) register write x2 0x00000001c0c63740
(lldb) po $x2
http://redacted-backend.redacted.com/

(lldb)
Figure 22: Change register x2 to new value
- Finally, just type
cto resume application so it will continue to run with new URL endpoint, the process no longer hit the breakpoint and look into Hopper Disassembler we can see all ofhttp://redacted-backend.redacted.com/endpoints are shown in HTTP History tab with requests and responses details, MISSION COMPLETED!!!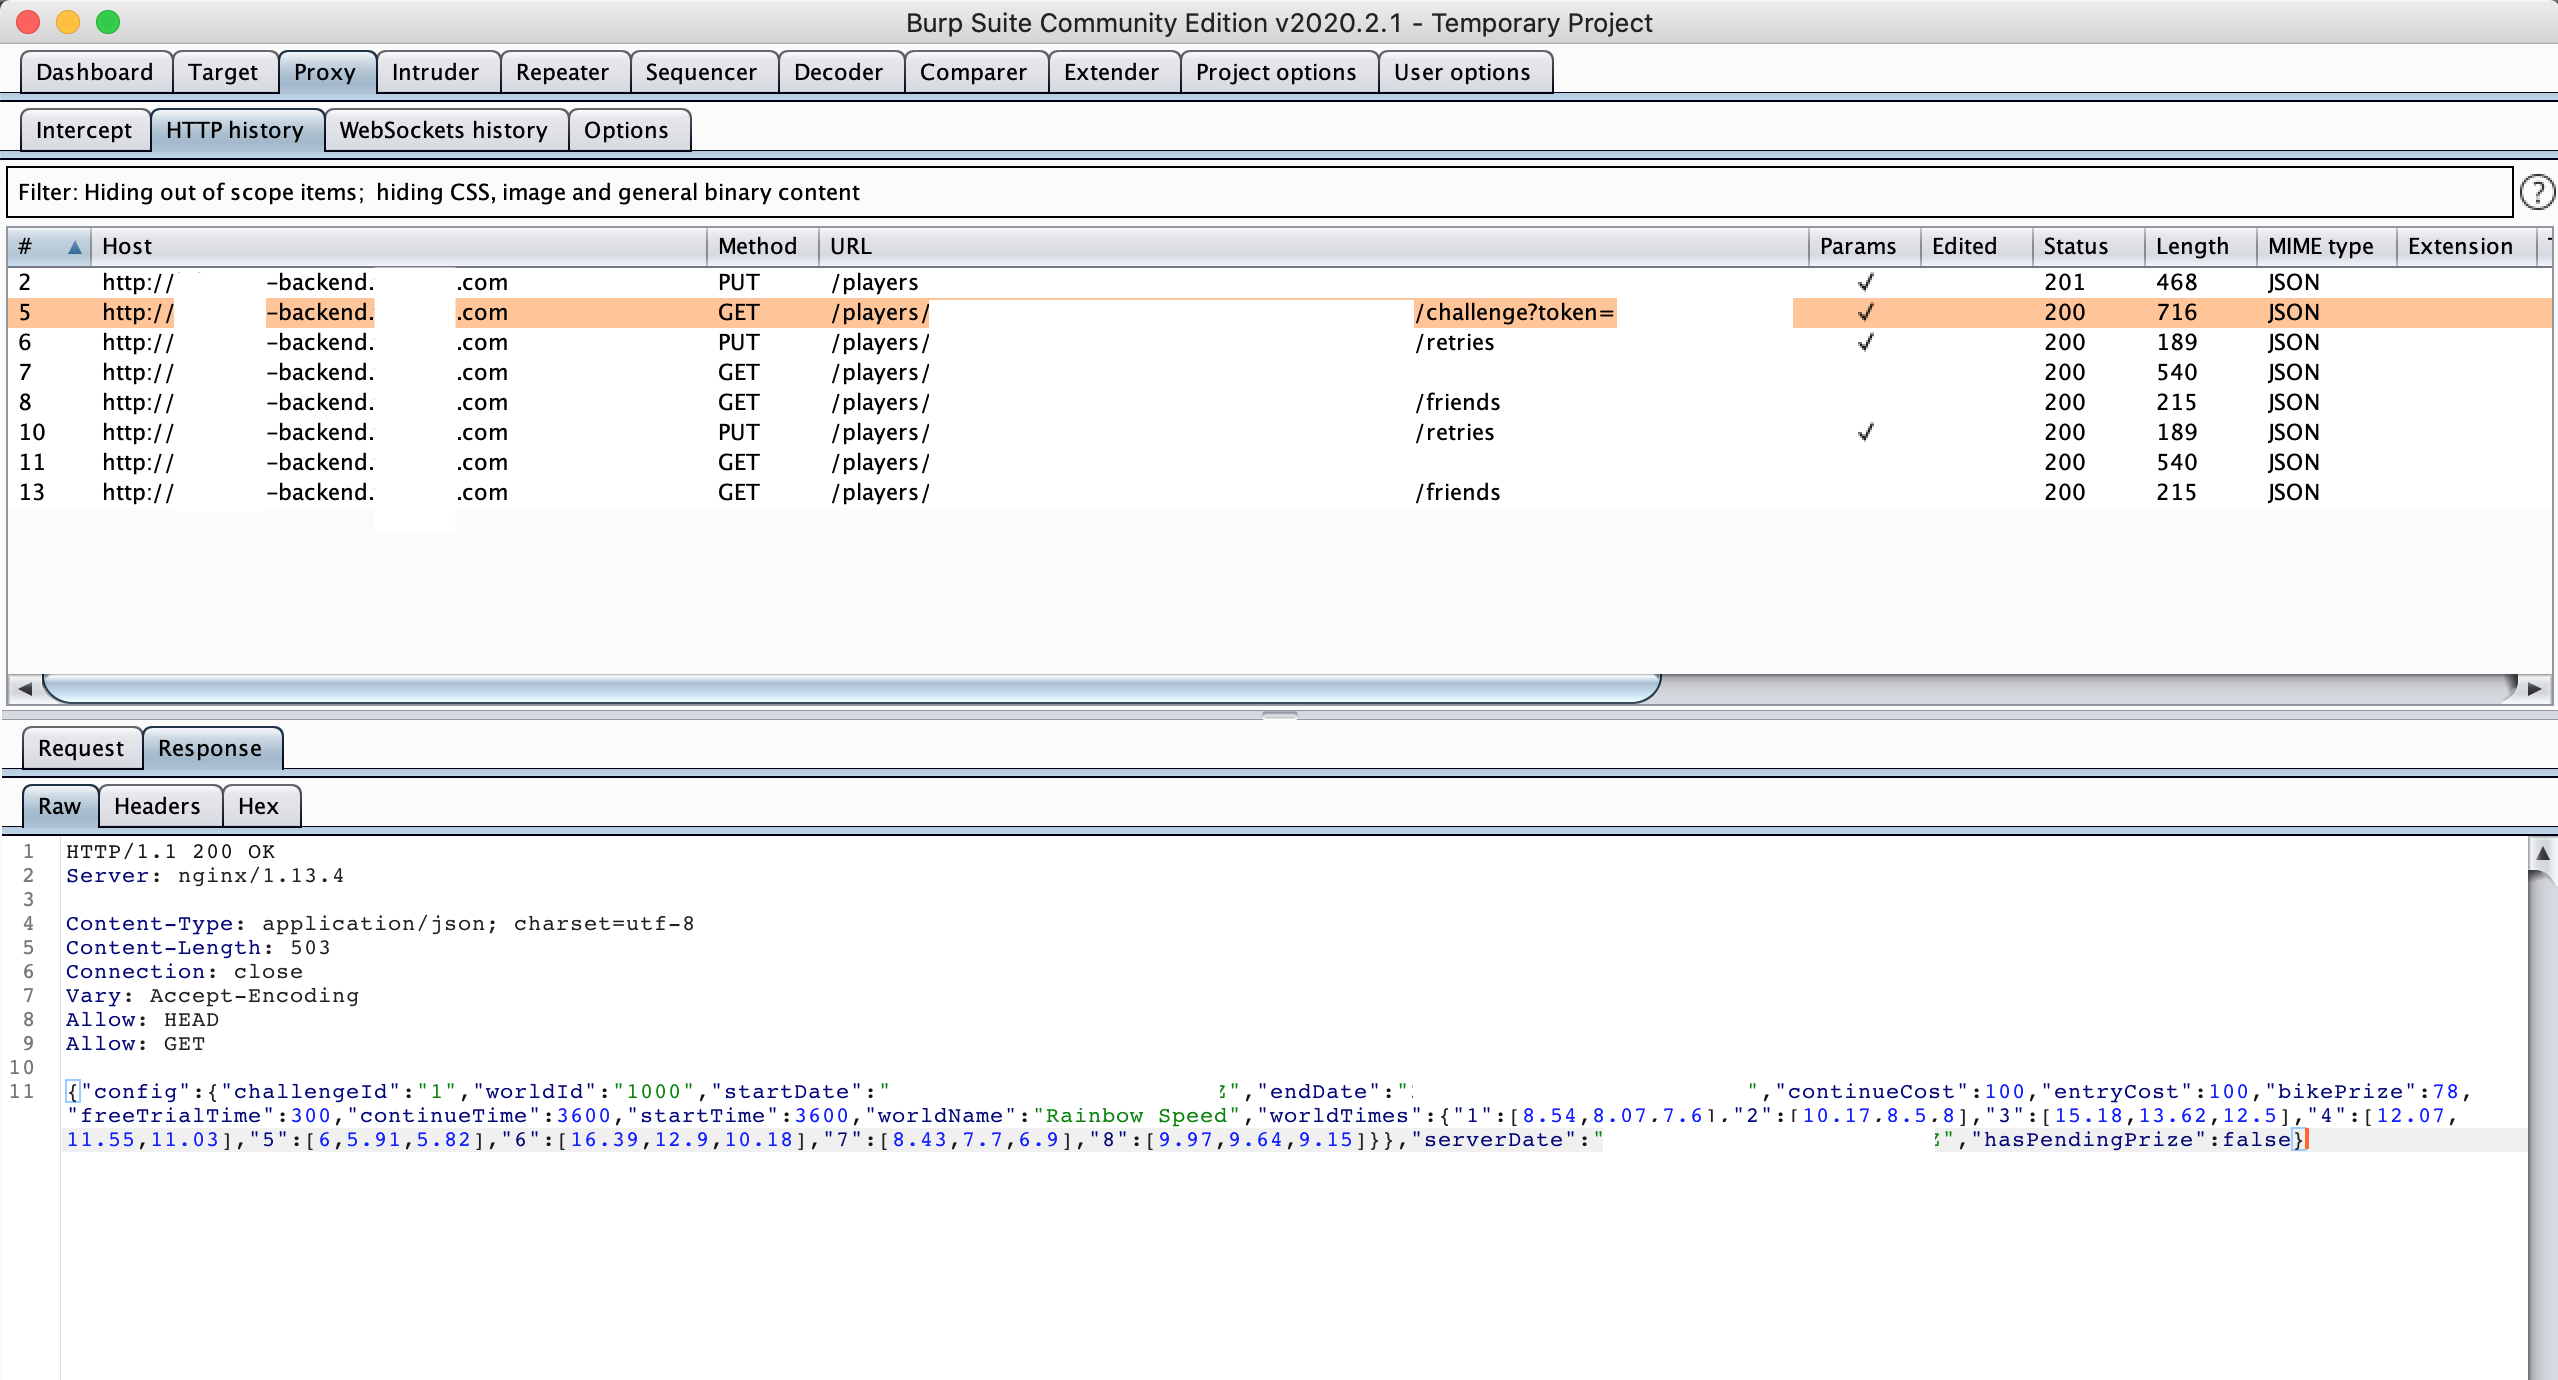
Figure 23: Hopper Disassembler can see applications requests & responses
Final thought
- SSL Pinning only work with
httpsprotocol, so to downgrade tohttprequests we can bypass easily - REDACTED server supports both
httpandhttpsprotocol so the app works normally when downgraded tohttp - For servers that do not support
httpprotocol, this kind SSL Pinning bypass will not work, but we can have our proxy to redirecthttptohttpsso it will work (client sendhttprequest to proxy -> proxy rewritehttptohttpsrequest and send to server) - LLDB is very powerful!! Play with registers is an advanced skill we can learn. You can do anything as long as you can attach a debugger into the running app.
- This app doesn’t have jailbreak and anti-debug detection, so we can do whatever we want without limitation. If you want to secure the app, you need to think about employing this detection in your codes.
Further readings
- Dancing in the Debugger — A Waltz with LLDB
- SSL Pinning in iOS app
- Assembly language wiki
- ARM architecture
I posted this on Medium also, feel free to clap and share your thoughts if you find it helpful :)